


OpenStack Multi-Node Installation | Control, Network & Compute
- April 23, 2014
In a previous blog article, we discussed how to install and use a single-node in OpenStack. In this post, we will discuss how to install multi-nodes in OpenStack. Here we go.
OpenStack Multi-Node Installation
Prepare Node
We will install OpenStack in three nodes: control, network and compute. Let’s prepare all three nodes for OpenStack installation.
Networking:
Following is the NIC card requirement for multi-node installation of OpenStack:
Compute Node
Two Network Interfaces:
- External Network: Used for External Connectivity
- Management Network: Used for connectivity for OpenStack nodes.
Control Node
Two Network Interfaces:
- External Network: Used for External Connectivity
- Management Network: Used for connectivity for OpenStack nodes.
Network
Three Network Interfaces:
- External Network: Used for External Connectivity
- Management Network: Used for connectivity for OpenStack nodes
- Data Network: Used for connectivity between VM’s.
Note that each network Interface must have a static IP.
Preparation of Control Node:
Networking
The control node has two Network Interfaces: One with network connectivity (eth0), and another internal network for Management use.
# vi /etc/network/interfaces
#External Network
auto eth0
 iface eth0 inet static
 address 192.168.100.10
 netmask 255.255.255.0
gateway 192.168.100.1
#Management Network
auto eth1
 iface eth1 inet static
 address 10.0.0.10
 netmask 255.255.255.0
gateway 10.0.0.1
# service networking restart
And set the hostname.
# hostname controller.flux7.com
# echo controller.flux7.com > /etc/hostname
Add OpenStack Ubuntu Cloud Archive repository
To install OpenStack we will add the latest stable release (Codename:- Havana) repository.
# apt-get install python-software-properties
# add-apt-repository cloud-archive:havana
# apt-get update
# apt-get dist-upgrade (Optional)
Install MySQL server
OpenStack services require a database to store information. We will use MySQL as a database back-end. OpenStack supports most of the popular database engines such as mongodb, PostGre, etc.
# apt-get install python-mysqldb mysql-server
The next step is optional for single node installation. If we need to add additional nodes, such as compute nodes or storage nodes, MySQL should start on all the interfaces, as the default is only for localhost.
# /etc/mysql/my.cnf
#bind-address 192.168.100.10 (Comment out this line or change 192.168.100.10 to 0.0.0.0)
Install Messaging server
OpenStack requires a messaging/broker service to communicate between its services. We will use RabbitMQ, but Qpid and ZeroMQ (0MQ) are also supported.
# apt-get install rabbitmq-server
It is optional to change the password in the dev environment, however, it is recommended in production. By default, the guest user is created with the password guest.
# rabbitmqctl change_password guest <New_Pass>
Now, the node is ready for OpenStack Installation.
Preparation of Compute Node:
Networking
The compute node has two network interfaces. One with network connectivity (eth0), and another internal network for management use.
# vi /etc/network/interfaces
#Management Network
auto eth0
 iface eth0 inet static
 address 10.0.0.20
 netmask 255.255.255.0
gateway 10.0.0.1
#Data Network
auto eth1
 iface eth1 inet static
 address 11.0.0.20
 netmask 255.255.255.0
gateway 11.0.0.1
# service networking restart
And set the hostname.
# hostname compute.flux7.com
# echo compute.flux7.com > /etc/hostname
Add OpenStack Ubuntu Cloud Archive repository
To install OpenStack we will add the latest stable release (Codename:- Havana) repository.
# apt-get install python-software-properties
# add-apt-repository cloud-archive:havana
# apt-get update
# apt-get dist-upgrade (Optional)
Install MySQL python library
On compute nodes we only need to install MySQL client and MySQL Python library.
# apt-get install python-mysqldb
Now, Compute node is ready for Installing OpenStack Compute services.
Preparation of Network Node:
Networking
The network node has three network Interfaces. One with network connectivity (eth0), another internal network for management use, and the other data network for connectivity between VMs.
# vi /etc/network/interfaces
#External Network
auto eth0
 iface eth0 inet static
 address 192.168.100.30
 netmask 255.255.255.0
gateway 192.168.100.1
#Management Network
auto eth1
 iface eth1 inet static
 address 10.0.0.30
 netmask 255.255.255.0
gateway 10.0.0.1
#Data Network
auto eth2
 iface eth2 inet static
 address 11.0.0.10
 netmask 255.255.255.0
gateway 11.0.0.1
# service networking restart
And set the hostname.
# hostname network.flux7.com
# echo network.flux7.com > /etc/hostname
Add OpenStack Ubuntu Cloud Archive repository.
To install OpenStack we will add the latest stable release (Codename:- Havana) repository.
# apt-get install python-software-properties
# add-apt-repository cloud-archive:havana
# apt-get update
# apt-get dist-upgrade (Optional)
Install MySQL python library.
On network nodes we only need to install MySQL client and MySQL Python library.
# apt-get install python-mysqldb
Now, the network node is ready for Installing OpenStack Compute services.
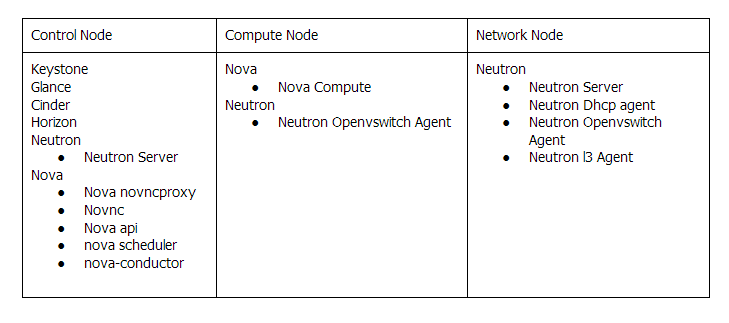
OpenStack Components On Different Nodes
Get Started with AWS
Receive AWS tips, DevOps best practices, news analysis, commentary and more. Sign up for our IT Modernization blog here and set your topic and frequency preferences. Or, download our guide on getting started with AWS, establishing a secure AWS enterprise architecture with Flux7 Landing Zones.
Subscribe to our blog